Showing posts with label How To. Show all posts

Saturday, May 27, 2023

How to get your model making mojo back

 If you're ever at a loose end, feeling uninspired with whatever miniatures you are making, I recommend building something fun and low-stress to get your model making mojo back. Think of it as a palate cleanser.


1/72 Japanese aircraft scale models


We've all felt it. You don't feel inspired to make anything. There's "nothing interesting" in that ridiculously large and expensive stash of unbuilt model kits you own ;) Or your regular subject just doesn't seem to catch you any more.


This video might just help. It has some suggestions at the end which certainly worked for me.


Get back into it!


Dave


Video link: How to get your model making mojo back


Friday, April 15, 2022

Miniature NYC firehouse from the 1984 movie "Ghostbusters"

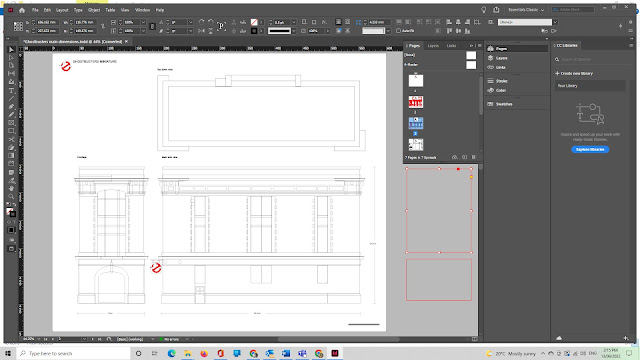
 This week I completed my latest miniature: a collector commissioned me to make the iconic Ghostbusters HQ building from the cult 1984 movie "Ghostbusters". The real building still stands in New York City - it is a NYFD Hook & Ladder Company firehouse.


Who ya gonna call? ;)


I didn't work to a particular scale (although it ended up being around 1/50 scale) - instead, I knew the rough final dimensions I wanted the completed miniature to be, so I drew up blueprints to match that final size. I used Google satellite view to get the basic dimensions, and then filled in the details using stills from the film, contemporary photos of the building I found online, and Google streetview. I designed this using InDesign, because I used to be a graphic designer and I know the program well, but any CAD or design software would work. Once I had the plans, I started building.


It's such an iconic structure, I had a lot of fun making it. I won't tell you the whole story here - instead, watch the video to get the detail!

Video is embedded below, but in case that doesn't work here is the link:
How I built a miniature Ghostbusters New York firehouse scale model

Cheers,

Dave


Wednesday, August 7, 2019

New video: How to scratch build a scale model house - Part 3

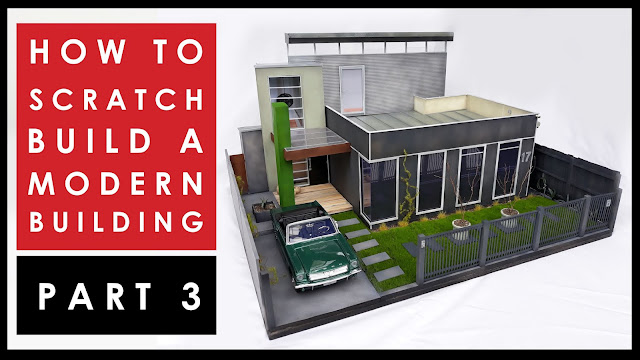
In this final episode of my 3 part series on how to scratch build a modern building, I go through building the base and groundwork, as well as accessories such as trees, pot plants, fences, gas meters, etc. It's pretty satisfying to see it all come together!


How to scratch build a scale model house - Part 3


In Part 1 I built the main, frontal structure. In Part 2 I constructed the rest of the building, including the side stairwell and the backing section. Now in Part 3 it all gets a base and the surrounding garden.


How to scratch build a scale model house - Part 3


My favourite part was combining the natural front garden with the straight-edged architecture - this mix of organic and inorganic is really interesting to me. Making the two work together requires a deft touch!

Video is embedded below, but in case that doesn't work here is the link:
How to scratch build a scale model house - Part 3

Cheers,

Dave


Sunday, July 28, 2019

New video: How to scratch build a scale model house - Part 2

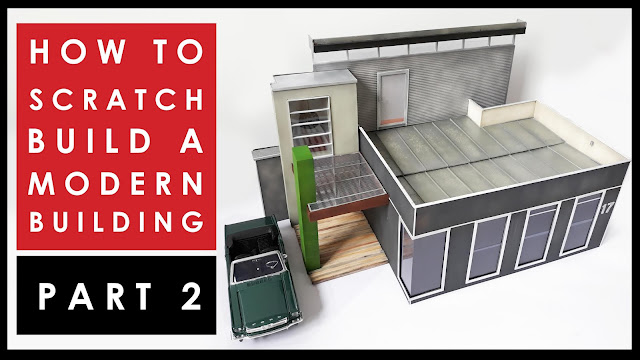
Here's Part 2 of my three-part series showing you how I construct a miniature building. In this video I show you how the main structure all comes together, as well as starting on some of the detailed architectural features like the front porch.


How to scratch build a scale model miniature building Part 2


At the end of Part 1 this is what the building looked like:


And here's where it is now:


As you can see, a lot of the overall shape and detail has been added. There are so many textures and angles and sub-assemblies on this build, it's really a challenge in organising myself.

Add to that the fact that it's not a very weathered or dilapidated house like I normally build, and I'm finding this build an exercise in discipline. I can't hide any mistakes under a layer of dirt or peeling paint. I can't cut wonky angles and just say to myself "Oh it's an old place, it's worn away there". I miss the wear and tear, but I'm enjoying the self-discipline required for this one.

Part 3 next week will be all about the groundwork and garden, so come on back then for that.
Video is embedded below, but in case that doesn't work here is the link:
How to scratch build a scale model modern house - Part 2

Cheers,

Dave


Saturday, July 20, 2019

New video: How to scratch build a scale model house - Part 1

Over the last few months I've had a lot of people ask me to video step-by-step what goes into making one of my miniatures. So with my latest I've decided to do just that.


video tutorial how to scratch build a scale model house


I'm currently building a commission piece, of a specific house here in Yarraville. It's a lot more modern than what I have previously built, and it doesn't have much weathering, peeled paint or falling-down stuff. So this is a bit more of a challenge for me, to make something more pristine - I don't have the safety net of being able to cover up any mistakes with dirt or grime!


The original house.


I expect this will be a three part series. In this Part 1, I build the front structure of the house. It's not a particularly systematic approach, I just happened to start with this section first.

As you'll see, there are no incredibly tricky techniques involved - it's all a matter of planning, measuring and having the patience to see it through.

Keep an eye out for Parts 2 and 3 in the next weeks.

Video is embedded below, but in case that doesn't work here is the link:
How to scratch build a scale model house - Part 1

Cheers,

Dave


Sunday, May 26, 2019

New video: How to make a mini diorama scene of chopping wood

Here's my latest video, it's a long one! In it I go step-by-step on how to create a natural miniature diorama of a chopping block tree trunk. It's in-depth, showing that literally anyone could make this - there are no phenomenal skills or techniques involved.


How to make a mini diorama scene of chopping wood


The scale is roughly 1:15 or so - it was guided more by the base than any specific measurements.

The only really unusual bit is the use of aluminium cooking foil to give size, strength and a basic skeleton for the sculpture.

How to make a mini diorama scene of chopping wood


Video is embedded below, but in case that doesn't work here is the link:
How to make a wood-cutting mini diorama scene

Cheers,

Dave


Wednesday, May 8, 2019

New video: How to scratch build metal trash cans for dioramas

Here's my latest video, showing you how to scratch build your own old-school metal trash cans for scale model dioramas. Perfect for adding a sense of grit and grime to any streetscape! I show you mine built in 1:20 scale, but in the video I also give dimensions to make these in 1:35 scale as well.


Video tutorial: how to make scale model metal trash can diorama scenery


It's a very satisfying technique. I won't lie, it's fiddly and tricky and time-consuming, but the results are well worth it.

Full disclosure: I first saw this technique in a Facebook photo tutorial by a modeller named Luc Po. So all credit for the technique must go to him. I just thought that the world could use a video tutorial, it's a lot easier to follow, and here it is.

Video is embedded below, but in case that doesn't work here is the link:

Cheers,

Dave


Saturday, April 13, 2019

New video: The easy way to paint a rust effect on scale models

This week is a follow up to last week - today it's all about the easiest way to paint rusted metal. Honestly, it's almost impossible to stuff this up. Plus it's another one of those fun, random, not-quite-sure-how-it-will-look-until-its-completed processes that I love so much.


The easy way to paint a rust effect for scale models


It's incredibly simple.


  1. Paint something with random splotches of Tamiya Red Brown XF-64.
  2. Then splatter on speckles of other shades of reddish, orangey, brownish tones.
  3. Then judiciously apply rust pigments.


Voila! You now have a piece of rusty metal.

There's really not a lot more to it than that - yes, there's room to finesse it, and of course feel free to play around with the technique, but it's pretty hard to mess it up. I love a process that can't go wrong!

Video is embedded below, but in case that doesn't work here is the link:
The easy way to paint a rust effect on scale models.

Cheers,

Dave


Friday, April 5, 2019

New video: How to paint a weathered galvanized metal effect for scale models

I received a few queries last week, asking me how I had painted the roofing in my corrugated iron video. So I'm releasing two videos in response - one showing how to paint a weathered, galvanized natural metal finish (this week) and next week I'll be showing you the easiest method ever for painting rusted metal.


How to paint a weathered galvanized metal effect for scale models and dioramas


For a galvanized metal finish, all you need is:

  • a dark metallic paint
  • a light metallic paint
  • a light grey paint
  • salt


That's it. Easy-peasey.

I'll let the video do the talking, but I think it gives a suitably realistic and weathered finish. The spots of darker metal could be slightly smaller to be more in scale, but I can live with it.

Video is embedded below, but in case that doesn't work here is the link:
How to paint a galvanized metal effect for scale models

Cheers,

Dave


Friday, March 29, 2019

New video: Dave's Cool Tool #1 - Corrugated iron maker

I've been playing around this week with a new gizmo, and it gives amazing results. It's a tool for making scale corrugated iron sheets. Normally I don't like to waste money on single-use tools, but I've been spending lots of cash on corrugated styrene sheet and I realised that there had to be a better solution. Now I can make as much corrugated roofing as I want at a tiny, tiny cost.


How to make corrugated iron for scale models and dioramas


I was starting to muck about trying to form my own scale corrugated iron using the corrugations inside cardboard... it wasn't effective.

I saw a couple of online tutorials about making your own tool. Hmmm, possibly...

Then I found this. It's from a hobby shop here in Melbourne, and they invented it themselves. For $20 it looks and performs much better than anything I could have jerry-rigged together, so I grabbed one. And I'm very, very happy with it. (You can kinda tell in the slightly overexcited video - I think I need to get out more...)

It was invented by Brunel Hobbies, and is available from their website - Brunel Hobbies.

By the way, this is in no way a paid recommendation - I have not received any commission, and I paid for my tool like a normal person. When I do find something good, I like to share it with you guys.

Plus, as an added bonus, it just looks slick.


Video is embedded below, but in case it doesn't work here is the link:
Cool Tool No1: make corrugated iron for scale models and dioramas

Cheers,

Dave


Friday, March 8, 2019

New video: How to make your own fallen autumn leaves for dioramas

Sure, you could purchase commercially available fallen leaves for your diorama. They look good, and it's a little touch that adds a lot of realism to a scene. But they're really, really expensive - $10 for about 2g of leaves in my local hobby shop. Why not make your own? As long as you have a sharp scalpel and a steady hand, it's easy.


How to make fallen autumn leaves in 1/35 scale for diorama scenery


It's just turning to Autumn here in Australia, which means there are heaps of dead leaves all over the ground. Slightly annoying if you have to rake them up, but for me they are sweet, sweet free leaves that I can chop up to make little tiny leaves.

It's pretty simple, so I'll stop writing and let the video do the talking.

Video is embedded below, but in case that doesn't work here is the link:
How to make your own fallen autumn leaves for dioramas.

Cheers,

Dave


Saturday, March 2, 2019

New video: Scale model detailing hint - drink more whisky!

I've been busy on my second scratch built 1:20 scale building, and yesterday I built a small lock for the door. I'm rather happy with it. While I was building it, I thought I should do a video for you guys explaining the brilliant, brilliant material that I used to make it: metal foil from the top of whisky bottles.


Scratch built padlock for scale model diorama


I absolutely love this stuff (the foil that is, not the whisky. Although I love that too...). It's really malleable, incredibly versatile, and it comes free with sweet, sweet whisky. Win/win.

Using metal foil from bottles for detailing scale models and scratch build dioramas


As I outline in the video, there are literally millions of uses for this when detailing your scale models: seatbelts, rifle slings, brackets to mount pipes to walls, plant leaves, clothing, fabric, etc etc. The only limit is your imagination.

It holds its shape forever. It takes paint beautifully (although I'd be safe and prime it first just to be 100% sure). It's available in a range of thicknesses, from almost 1mm to 0.1mm, depending on what bottle you source it from.

Plus, did I mention you get to drink the whisky inside the bottle?

Video is embedded below, but in case that doesn't work here is the link:
Scale model detailing hint: Drink more whisky!

Cheers,

Dave


Friday, January 25, 2019

New video: Scale model figures 'how to' guide - Part 1 Construction and building

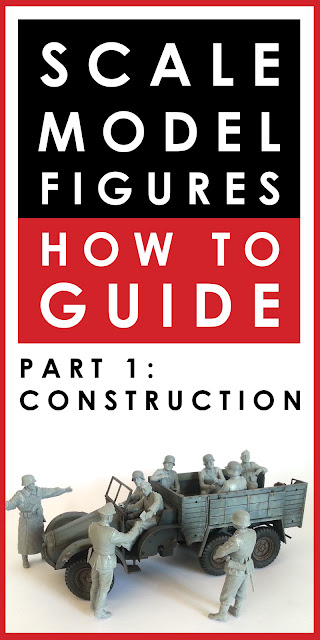
In this new multi-part video series I will show you how to build and paint scale model figurines, mostly concentrating on 1/35 military miniatures. The series is mostly aimed at beginners, but I hope there is something of value to more experienced model makers as well.


Scale model figures 'how to' guide - Part 1 Construction and building

In this first part I go step by step through construction: what tools, you'll need, how to clean flash from the mouldings, how to get limbs attached as cleanly as possible, and how to fill the inevitable gaps when they sometimes don't come together as nicely as you'd like.

I'm doing a group of 1/35 German figures at the moment, as part of my ongoing Krupp Protze diorama, and I figured it was a good chance to cover off some basics and really get deep into the detail of model figurines. I know a lot of modellers struggle with figures - they can produce absolutely stunning armour or aircraft, but when it comes tome to prop the machines with people around them for a sense of scale it can be a bit daunting for some.

Like most things in life, it all comes down to practice (as I regularly tell my 6 year old daughter) but there are a couple of hints to take on board and some traps to avoid which do make it a lot easier, and more of a pleasure, to build and paint model figures.

The video is embedded below, but in case that doesn't work here is the link:
Scale model figures 'how to' guide - Part 1 Construction and building

Cheers,

Dave


Sunday, December 9, 2018

New video: How to add a blue tone to Panzer grey

I've been busy working more on my Tamiya Krupp Protze - this week I've been trying to fix a problem in the paint on some side boards, and I've also been playing around with adding a blue tint to the German Grey colour.


How to add blue tone to Panzer grey on your scale model armor


In this video there are some wins, and some losses.

But I did work out a new way to add a blueish tone. It's not revolutionary, it's really just a tweaked half filter / half dot filter technique (I've covered these in a previous video). But it's definitely something I hadn't previously done, and it's rather satisfying!

Video is embedded below, but in case that doesn't work here is the link:
How to add blue tone to Panzer Grey

Cheers,

Dave


Tuesday, October 30, 2018

New video: How to rig a model airplane - easy rigging for scale WW1 aircraft

My latest video shows you the easy way to rig a scale model aircraft. Monoplane, biplane or triplane, this is the easiest solution I have found to instal rigging on WW1 and 1920s planes.


How to rig a model airplane - easy rigging for scale WW1 aircraft


Rigging can be daunting - I'll be honest, I was procrastinating over rigging my Wingnut Wings Fokker, because at first glance it just looks so complicated and difficult. But I promise, with the right materials and a little practice it becomes easier, you find a groove and it becomes a production line. Honest.

Originally I was stressing myself, trying to make overcomplicated turnbuckles and eyelets for my rigging and messing with my own mojo with how difficult it was all going to be. If you want to go down this route, all power to you. But I listened to a podcast with Richard Alexander, the General Manager of Wingnut Wings, and he shared his technique for rigging. It's now my preferred technique, it's a lot easier, and if it's good enough for the GM of WNW, then it's good enough for me.

Video is embedded below, but in case that doesn't work here is the link:
How to rig a model airplane - easy rigging for WW1 aircraft

Cheers,

Dave


Thursday, October 18, 2018

New video: The 3 simplest ways to improve your scale modelling skills

I had a moment this week when I was sanding away at a poorly fitting join, and I thought just how much I don't enjoy sanding models. After a little more thought, I decided that sanding and cleaning my airbrush were my two least-favourite parts of the hobby. A little more thought again and I realised that the day I confronted these two least-favourite parts of building was actually a really powerful and simple way I improved my builds.


In light of this, my latest video discusses three really simple ways to improve your builds. These are low-hanging fruit - relatively obvious things, but nonetheless important ways to improve your modelling skills, and like the example above they are powerful and simple tools for improving your abilities, no matter if you are an absolute newbie or if you've been modelling for years.

I hope that the title of this video doesn't feel too "clickbait-y". I promise it's not meant to be!

Video is embedded below, but in case that doesn't work here is the link:
The three simplest ways to improve your scale model builds

If you have any feedback, or if you have any other suggestions for simple ways to improve builds, please comment below.

Cheers,

Dave


Tuesday, October 16, 2018

Painting another 1/10 scale driver figure


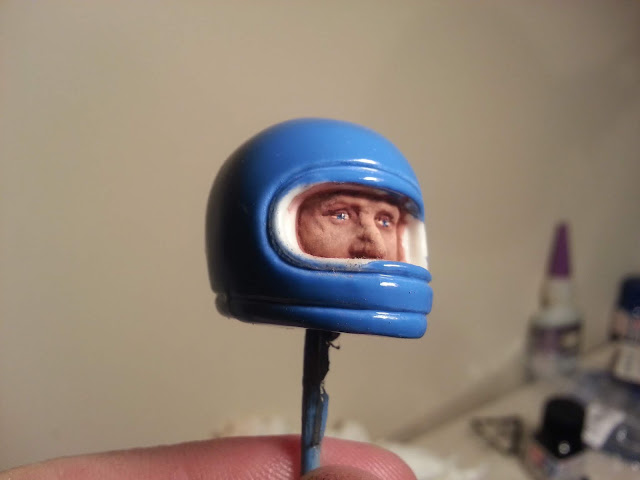
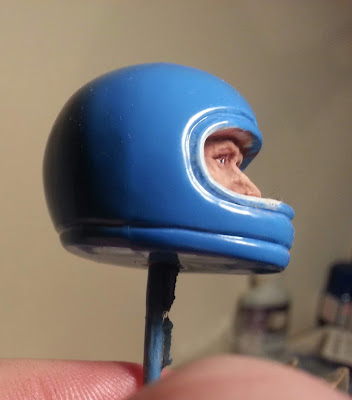
I'm building my second RC buggy, the Tamiya Hornet. Why am I building that at the moment, I hear you ask, and breaking my own rule of not building two projects at once? Because I'm procrastinating over tackling all the fiddly, mind-numbingly intricate rigging and cutting out teeny tiny turnbuckles for the Wingnut Wings Fokker...


As part of the build, I've got another 1/10 scale driver figure to paint (previous Sand Scorcher driver is here). It's satisfying to paint these little guys, for two reasons:

  1. they're a lot larger than the 1/35 scale figures I usually paint
  2. it's weirdly satisfying to paint these well, even though it is usually barely visible inside the vehicle. I don't know why.


So I'm painting the Hornet driver's eyes, and dammit: one eye is perfect, and one eye looks like a randomly applied blob of paint. The eyes are always the hardest part of a face to paint, and I got it 50% spot on and 50% nope, not quite.

Tamiya Hornet driver figure
Hmmm, that eye on the right hand side of the photo is a bit sketchy...

Tamiya Hornet driver figure

Tamiya Hornet driver figure

Tamiya Hornet driver figure
Pictured: the good eye.

Tamiya Hornet driver figure


I'll see what I can do to fix this...

Cheers,

Dave


Friday, October 5, 2018

New video: How to paint a realistic WW1 wooden propeller

The Wingnut Wings Fokker continues, and in my latest video I show you how I've painted the laminated wooden propeller. I've taken a little artistic license here - technically it should be something like seven layers thick, not three, but you get the idea. It looks good to me, and it looks like real wood.


How to paint realistic laminated wooden propellers for WW1 aircraft scale models


It's a very simple technique. Basically it involves a base layer of lightish acrylic paint, and then a further layer of darker raw umber acrylic.

The magic happens when you cover that with washes of burnt umber oil paint. This gives the wood its richness and tonal variation.


How to paint realistic laminated wooden propellers for WW1 aircraft scale models

How to paint realistic laminated wooden propellers for WW1 aircraft scale models


What I love about this technique is that it is incredibly forgiving. If you stuff something up, it is tremendously easy to wipe it away and have another go, and another go, until it looks good to you.

The video is embedded below, but in case that doesn't work here is the link:
How to paint realistic wooden propellers for WW1 aircraft

Cheers,

Dave


Wednesday, October 3, 2018

Painting my wooden propeller

I can't keep it in - I'm pretty damn chuffed with how this is working out so far. Here's the current progress on painting the wood effect of my Fokker's propeller.


Painting a wood effect on scale model aircraft propellers


I'm rather happy with that.

My partner asked if the kit comes with an actual wooden propeller when she saw this.

Not bad for a bit of plastic, eh?

Painting a wood effect on scale model aircraft propellers

Painting a wood effect on scale model aircraft propellers


I'm currently filming a how-to video on how I achieved this, which I hoe to have out this weekend.

Stay tuned!

Cheers,

Dave

Wednesday, September 19, 2018

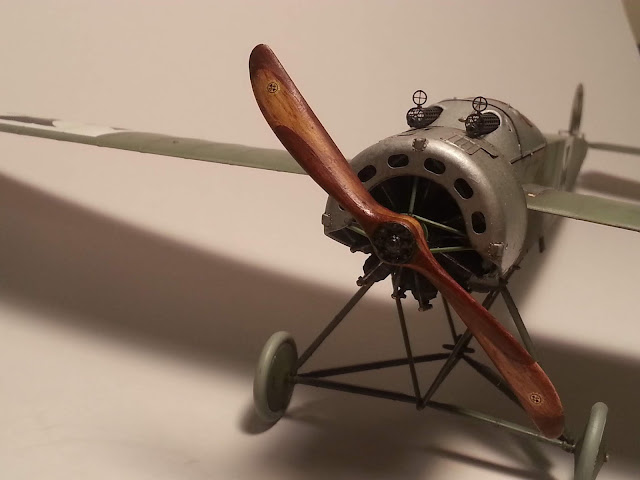
Painting the turned aluminium effect of the Fokker's cowling

I spent a couple of hours last night working on the Wingnut Wings Fokker, and in particular I worked on the turned aluminium cowling. I have two words to describe this process: time-consuming.


These period photos show the effect I'm trying to replicate. It's a squiggly, curvy snaking line of polished turned aluminium that covers the entire cowling and exposed aluminium surfaces at the front of the aircraft.

Source.
Source.

Source.


And here is my attempt at capturing this look so far:


I'm going to produce a video very soon showing how I achieved this effect, but all I will share right now is that it involves a lot of time, a good set of eyes, bright light and a lot of patience!

Cheers,

Dave